Opposition instructions are one of those frustrating things you only remember after conceding two easy goals while testing your new tactics.
I have always hated going through each opposition player before every game trying to find a way to successfully nullify them until I settled on a rough outline that I currently set at the beginning of a new save game and forget about it for the rest of the save.
It saves me time and getting frustrated, and although it might not be optimal in all occasions depending on opposition strengths and my players’ weakness, it will work well more often than not.
Choosing The Opposition Instructions
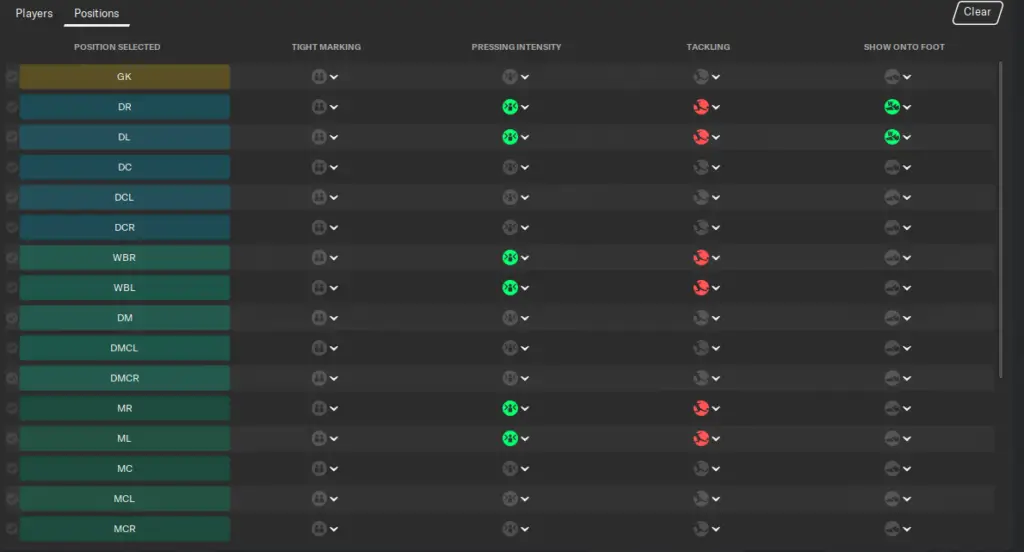
The first thing to do, is to separate the opposition players into blocks, i.e. Central Defenders, Fullbacks and Wing Backs, Central Midfielders and Defensive Midfielders, Attacking Midfielders, Wingers and finally Strikers.
This will make it easier to target the opposition according to the roles they perform on the pitch, and the positions they take up.
Central Defenders
Generally, most central defenders you will be facing in your football manager save game will be relatively average on the ball.
Obviously from time to time you will be facing the likes of Sergio Ramos and Mats Hummels who are exceptional on the ball, and might hurt you with pinpoint long-range passing, but these occasions will be few and far between.
Therefore, in the opposition instructions table, I do not put any instructions on the opposition centre backs.
This is because, there is no point in ruining your defensive shape to close down a centre back quickly, as he will often have possession far away from your goal and threats from long balls unlocking your defence are minimal.
Unless the opposition is using a libero who will be more likely to venture into the midfield and act as the playmaker, which is very rare from the AI, centre backs do not pose much danger to your team and are best left alone.
Fullbacks and Wingbacks
Unlike the centre backs, fullbacks and wing backs are most of the time willing to run up and down the flanks, and given space and time, will hurt your team with early crosses or through balls depending on how the opposition has set up.
For this reason, my opposition instructions for these roles are; pressing intensity set to always and tackling set to harder.
Since according to my observations, most fullbacks generally do not have strong weak foots as compared to the more adventurers wing backs, I also add the “show onto weaker foot” instruction for them.
Defensive Midfielders and Central Midfielders
I normally group these two together since depending on the roles you have selected for them, they will largely occupy overlapping spaces.
Press them too much, and you risk your midfield losing shape as you chase the opposition all over the middle of the park.
On the other hand, give them too much space, and the high quality of passing most midfielders have, will unlock your defence with ease.
Depending on your style of play, this is where you can slightly mix it up.
If you are largely a counter attacking team that does not press high up the pitch to win the ball as quickly as possible, leave the opposition instructions blank.
Let the opposition have the ball then you will try to win it back only once they are closer to your goal and more spaces have opened up behind them for counter attacking opportunities.
If on the other hand you like playing high tempo football and want to win the ball back as quickly as possible, then set tackling to “hard” and pressing to “always” for all the central midfield and defensive midfield positions.
I personally leave the opposition instructions for these positions blank, despite normally playing a style that is a mixture of possession and vertical tiki taka.
Attacking Midfielders
The attacking midfielder in most teams is normally the most creative player on the pitch, and for this reason alone, I always set tackling to hard.
I also avoid closing down a player in this position, as more often than not they are agile and will easily beat your press, leaving your defence exposed.
This makes the attacking midfielder position, the first one I turn to tight marking. This will work exceptionally well if your system has a defensive midfielder.
If you do not have a defensive midfielder, one of your central midfielders will pick the opposition attacking midfielder and stick with him.
Wingers
Similar to wing backs, wingers will expose your team in wide areas with their pace and crossing ability.
In addition to giving you headaches in these areas, some wingers will also cut inside while playing as inverted wingers or inside forwards to create overloads in the central areas.
However, I tend to deal with these two kind of wingers in the same way, tackling harder and always pressing them.
Pressing them all the time might expose you once in a while, especially when you come across tricky wingers like Mahrez or Rashford, but it is often a good choice as you will stop most attacks before the winger gets some momentum into the final third.
You can add the show onto weaker foot instruction here, but attackers are generally adept in using both feet to a good degree, and giving them space on their weaker foot might not necessarily be a disadvantage to them therefore I tend to avoid it.
The most important thing is preventing balls getting into the box, and tackling them harder while pressing them constantly is an effective way of going about it.
Strikers
Strikers are a nuisance and will always find a way to get on the scoresheet.
Since pressing strikers leads to the backline getting out of shape in case they roam from their position, I only tightly mark them then set the tackling to hard.
This way I am assured my centre backs will not be pulled by the strikers into all sorts of areas exposing the keeper, and they will also be more forceful in trying to win the ball back once the opposition strikers are in possession of the ball.
Final Thoughts on Opposition Instructions
Now, this guide is an outline for lazy managers like me who do not fancy fiddling with opposition instructions at the beginning of every match.
It will work well most of the time, but keep an eye on your assistant manager’s suggestions during the match, although most of the time they are useless but once in a while he might point out an area where your team is getting dominated then make the necessary changes.
Ideally, you would want to set the opposition instructions that are tailored to the strengths of the team you are up against, but most of the time this is not possible as this little exercise cumulatively takes so much time.